
Wow, I am getting a studio. The studio/garage will have two windows and a glass door and most exciting of all, a sink. I will be able to dye my fabric and yarn without making a mess in the kitchen. I can't wait (and neither can dh).
I will be able to play with my blow torch, I promised B that I wouldn't use it indoors, but last summer was so windy that I couldn't play.
Monday 3rd March
Day One. Colin and Ben the builders arrived. It was very cold but they worked hard until dark and by the end of the day my footings were dug.
Day One. Colin and Ben the builders arrived. It was very cold but they worked hard until dark and by the end of the day my footings were dug.
Day Two. Daylight and my footings were full of water. Pump hired and left running all day and night.
Day Three. Footings still full of water. Water board man came and confirmed we have a leaking pipe somewhere, good news, it was chlorinated water therefore clean :) Bad news, we have to find the leak before we can fix it. 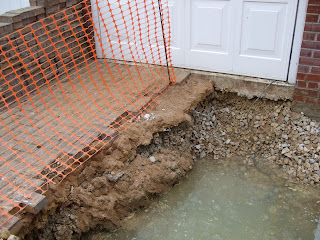

Day Four. The hole grows. My beautiful block paved driveway isn't any more. It is a pond. Broken pipe fixed. Whippee. Spoke too soon! Hole re-fills with water! Water board man comes back. "Where's the hydrant"? Works out where the hydrant should be, sends for team to dig up block paved driveway to uncover the hydrant. Raise grids, (won't replace block paving for 3 months to allow for pipe work to settle. Ergo 2nd hole in driveway.) The uncovering of the hydrants allows for turning off the water supply to our house. Pump water out of hole. Hole fills with water.
Day Five. Dig up next door neighbour's block paved driveway. Find broken pipe. Fix.
Week Two.
Day One. Colin and Ben tidy up footings, clear out soggy clay, send for building inspector to give ok.
Day Two. BI comes and he says "YES"! Colin and Ben the builders work hard all day laying cement.
Day Three. Foundation bricks are layed.
Day Four. Cold wind and rain.
Day Five. Cold wind and rain.
Week Three.
Day One. The bricks arrive. Day Two, the doorway is visible, both Colin and Ben work hard all day.
Day Two, the doorway is visible, both Colin and Ben work hard all day.Day Three. By the end of the day I can see 

where the door and windows will be.
Day Four. Pouring with rain, windy and cold.
Day Five. Bank Holiday.
 This is what I found this morning. It is supposed to be spring!!!
I want to stamp my feet. I want my studio now...


 This is what it looks like on the inside, the flaps hold a little notebook and tickets or receipts etc

